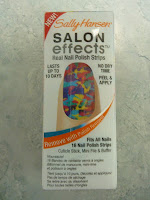
So I bought a pack of these months ago and they have just been sitting with my nail polish doing a lot of nothing. But today, as I was doing absolutely nothing with my uni holidays, I made a decision... to finally attempt these things!
Now I am not going to lie I was pretty intimidated by these. I was thinking they would be tricky and stubborn and I would end up wanting to throw them out the window but they were surprisingly nice and really quite easy. Legit after I figured out how to do the first one the rest were a breeze.
I went with design 380 "Collide-O-Scope" and paid about $16 for them
You will need to make sure you have clean nails, shaped and buffed as you please
***NOTE OF IMPORTANCE***
Once you unseal the foil pack with the strips in them you are committed! Cause they are made of real nail polish they will dry out with in the day so there is no turning back once you begin
Each pack has eight strips so go along and work out which size is good for each of your nails
I would recommend going slightly larger rather than smaller if you can't find one that fits exactly, it is easy to get rid of excess from around the nail
First peel off the plastic cover and then break off the tab - I'm not entirely sure what the purpose of this tab is but I don't really care either
Carefully peel off the nail polish strip from the backing paper making sure you don't fold or tear it
Place the strip on your nail starting near the cuticle and then gently but firmly rub it down across your nail working out any bubbles then slowly stretch it over and under your nail and use the buffer and file to remove excess
If there is some excess around the sides of your nail use the cuticle stick and run it along the side of your nail and pull the excess off
Ta Da!!!
Now unless you are special and have 16 fingers you are going to have some left overs and we don't want them going to waste now so I give you two options:
1. Do your nails with some girlfriends and share them round! Mix up the patterns and create some epic and unique manis
2. Do your toes! By using what was left from mine and cutting some in half I had enough to do all my toes as well!
I am seriously in love with these, incredibly happy with my matching mani and pedi, surprised by how easy they were to use, stoked by the "no dry time" and keen to try out some different designs
Go and make your nails awesome :)


No comments:
Post a Comment